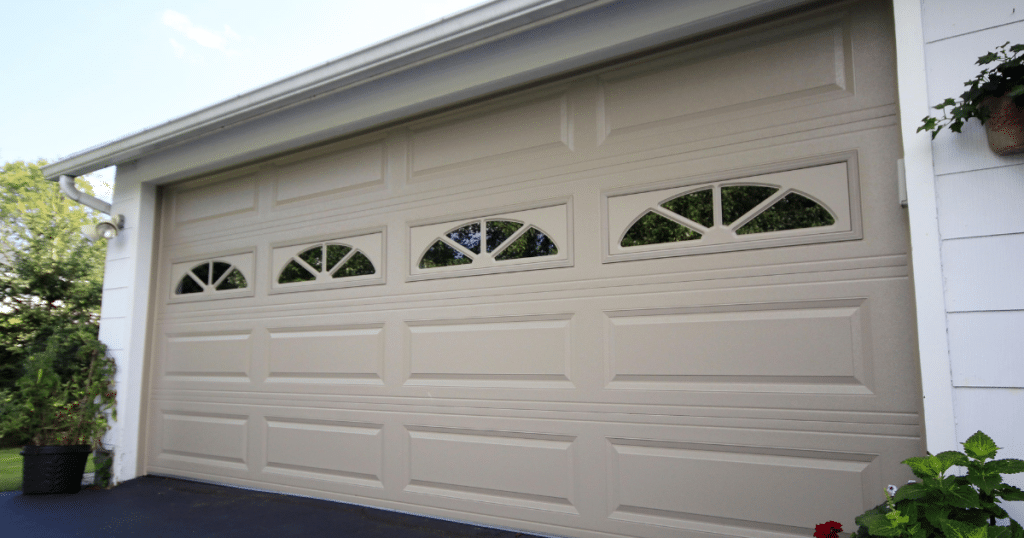
Garage Door Recessed Panel: Timeless Style & Durability

A garage door does more than just close off your space. It also adds style and value to your property. Choosing a strong and stylish door design offers lasting benefits, helping your home stand out with a clean, neat look that feels complete and welcoming. Homeowners often choose this door style because it mixes beauty with strength. A garage door recessed panel offers a smooth, classic look that fits many home types. Its design adds a sharp finish that lasts, helping improve both the function and appearance of your garage exterior. Read more to learn easy tips about this popular garage door style. Find out what materials to use, how to care for them, and how to choose, install, and keep them working well. What Is a Garage Door Recessed Panel? A recessed panel garage door has flat sections with sunken rectangles. These shapes don’t stick out like raised panels. Instead, they give the door a clean, smooth look that feels neat and simple. This style fits many homes, like craftsman, colonial, and traditional houses. It gives your garage a classic look without being too fancy. Many homeowners like it because it looks good but isn’t too flashy. The panels have soft framing that adds just the right amount of shape. This small detail adds a nice design to the door that doesn’t stand out too much but still brings charm to the home. The recessed areas also create light shadows, which give the door more depth and appeal. It feels more like part of the house’s design and less like just a regular garage door. Why Homeowners Choose Recessed Panel Garage Doors Recessed panel garage doors are popular for their clean design, classic look, and wide appeal among many homeowners today. 1. Timeless Look Recessed panel garage doors have a classic look that stays in style. Whether your home is new or older, this door design fits right in. Its simple, traditional style makes it a smart long-term choice that always looks clean and well-matched with any exterior. 2. Matches Many Homes These garage doors work great with a variety of home designs, like colonial, craftsman, or modern. The clean panels don’t clash with other features, so it’s easier to plan your look. This makes recessed panels a flexible choice for remodels, upgrades, or building a brand-new home. 3. Low Maintenance Recessed panel garage doors made from strong materials like steel or fiberglass are easy to maintain. The flat surface is easy to wipe down, and dirt doesn’t stick as much. They’re perfect for homeowners who want low-hassle upkeep and lasting durability. 4. Better Curb Appeal Upgrading to a recessed panel garage door instantly improves your home’s appearance. Its clean, classic lines add charm without being too bold. This small update can make a big difference, especially if you’re thinking about selling your home in the future. Materials That Work Best with Recessed Panels The material you choose affects your garage door recessed panel’s look, durability, and lifespan. Here are the most popular options. Steel Steel is a durable and popular material for recessed panel garage doors. It doesn’t bend, crack, or get damaged by weather easily. Some steel doors have a special finish that looks like wood. This gives you a classic style without requiring frequent cleaning or repairs. Wood Wood garage doors add a warm, natural look to your home. Types like cedar, mahogany, or redwood give a rich feel. But wood needs care. You’ll need to paint or seal it regularly to protect it from rain, bugs, and everyday wear and tear. Fiberglass Fiberglass garage doors are light and easy to handle. They don’t rust or rot and can last a long time. Some fiberglass doors are made to look like wood. This makes them an excellent choice for anyone who wants a wood style without the hard work. Aluminum Aluminum garage doors are lightweight and rust-resistant, which is perfect for wet or coastal areas. While not as strong as steel, new aluminum doors can keep your garage warm and look stylish. They’re easy to take care of and work well in many home styles. Vinyl Vinyl is a good choice if you want a door that’s strong and easy to keep clean. It doesn’t dent or scratch easily, which is great for homes with kids or pets. Vinyl garage doors stay looking good with minimal effort. Garage Door Insulation for Better Energy Efficiency Insulated recessed panel garage doors offer more than style. They offer real benefits that enhance comfort, reduce costs, and provide long-term value. Better temperature control: Keeps garage warmer in winter and cooler in summer. Energy savings: Helps lower heating and cooling bills. Noise reduction: Blocks outside noise for a quieter home. Increased durability: Resists dents, warping, and daily wear. Great for attached garages: Prevents drafts in nearby living spaces. How to Customize Your Garage Door for a Perfect Home Look A recessed garage door design has a clean look, but you can customize it with windows, colors, and decorative hardware. Windows: Adds natural light and boosts curb appeal Choose clear, frosted, or decorative glass Options available for privacy or style Color Finishes: Match your door to trim, siding, or shutters Custom colors offered by most brands Popular choices include white, black, brown, and wood-tone Decorative Hardware: Add faux hinges, handles, or latches Creates a carriage-house look Stylish add-ons that don’t affect function How to Install a Garage Door That Lasts Installing a recessed panel garage door the right way ensures smooth operation, longer life, and fewer repairs down the road. Here are the top tips: Start with Precise Measurements: Measure the width, height, headroom, and side clearance of your garage opening accurately to avoid fit issues during installation. Choose Quality Materials: Select durable materials like insulated steel or wood, based on your climate, style, and maintenance preferences for long-term results. Use a Level Surface: Ensure the floor and mounting surface are level and free of cracks or uneven spots to help
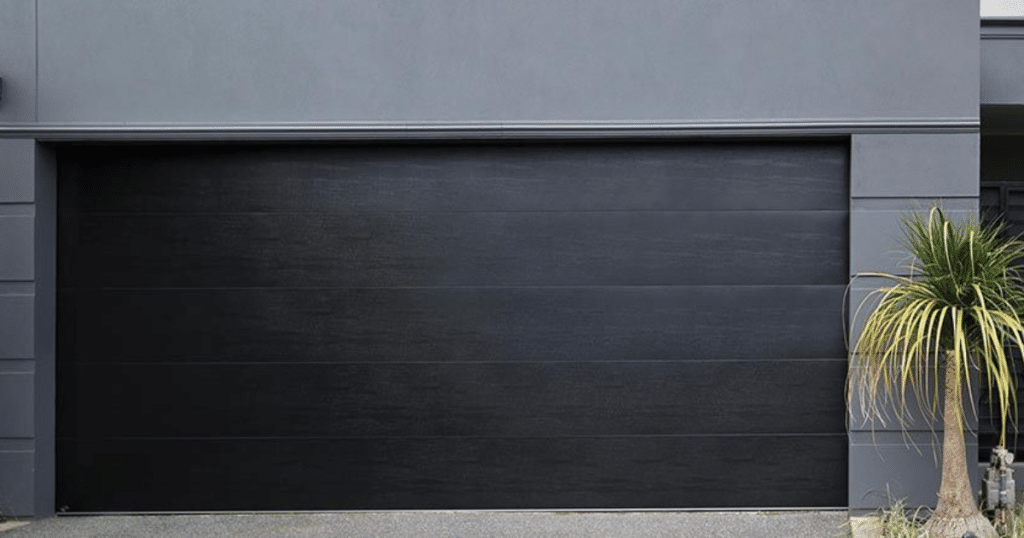
Affordable Long Panel Garage Doors With Windows: 2025 Picks
A garage door can enhance the appearance and functionality of your home. Many homeowners want a design that adds curb appeal, brings in sunlight, and stays within budget. A well-chosen door can easily boost both comfort and property value. Modern garage doors with clean lines and window panels are now a favorite choice. They help brighten dark garage spaces and give the front of your home a fresh, stylish appearance without requiring major structural changes. If you’re replacing an old garage door or choosing one for a new home, this guide shares top long panel garage door with windows choices, money-saving tips, and helpful advice to decide what’s best for your home. Why Choose a Long-Panel Garage Door with Windows? A long panel garage door with windows looks nice and works well for everyday use. Here’s why they’re a great investment: Enhanced Curb Appeal: The sleek, horizontal panels create a contemporary look, while the windows add a touch of sophistication. Natural Light: Windows reduce the need for artificial lighting during the day, saving energy. Durability: Modern materials like steel and fiberglass ensure long-lasting performance. Increased Home Value: A stylish garage door can boost your property’s resale value. With 2025 trends leaning toward minimalist garage door designs and energy efficiency, these doors are more popular than ever. Top Materials for Long Panel Garage Doors With Windows Choosing the right material for your long panel garage door with windows helps boost both curb appeal and long-term durability. 1. Steel Steel is a top choice for long-panel garage doors with windows. It’s tough, budget-friendly, and holds up well in any weather. New models often include insulation, which helps lower energy bills and keeps the space more comfortable throughout the year. 2. Aluminum Aluminum doors are great for modern homes. They’re lightweight, strong, and rustproof, making them ideal for coastal or humid areas. Many come with tempered glass windows for safety and style. Though slightly more expensive than steel, they offer a clean, high-end finish. 3. Fiberglass Fiberglass looks like real wood without the high maintenance. It doesn’t rot, warp, or crack easily, which is helpful in humid places. Some models include stylish window inserts, adding charm while keeping the door low-maintenance and long-lasting. 4. Wood Wood doors bring a classic, natural look to any home. They can be shaped or painted in many ways to match your style. Although they need more care than steel or fiberglass, their classic design and custom feel make them a popular choice. Design Trends for Long Panel Garage Doors With Windows Enhancing your home’s exterior becomes easier with these 2025 design trends for long panel garage doors with windows, combining style and function. 1. Black Frames and Clear Glass Black frames with clear glass are a top trend for 2025 garage doors. They stand out on light doors and add a sleek, modern style. Clear glass also lets in plenty of natural light while keeping the outside view sharp. 2. Frosted or Textured Glass This type of glass offers privacy without blocking out sunlight. It’s perfect if you use your garage as a workspace or simply want added style. This type of glass softens sunlight and stops people from seeing inside without blocking brightness. 3. Minimalist Hardware Many homeowners now want garage doors with simple, clean hardware. Hidden hinges and no handles give the door a seamless appearance. This modern design keeps the focus on the long panels and windows, helping the door blend in with newer home styles. 4. Mixed Materials Mixing materials like steel and wood creates a cool, custom look. A steel garage door with wood-framed windows adds warmth and charm. This mix also provides strength from the metal and a natural, cozy feel from the wood, making it perfect for stylish homes. How to Save Money on Your Garage Door Purchase A long panel garage door with windows doesn’t have to break the bank. Here’s how to stay within budget: Choose Standard Sizes: Custom sizes cost more, so stick to standard dimensions if possible. Opt for Partial Window Inserts: Instead of full-length windows, select smaller inserts to reduce costs. Look for Seasonal Discounts: Many manufacturers offer promotions in late winter and early fall. Consider DIY Installation: If you’re handy, self-installation can save labor costs (though professional installation is recommended for precision). Affordable Long Panel Garage Doors With Windows in 2025 Looking for stylish and durable garage doors? Here are the best long panel garage doors with windows available from trusted manufacturers like Clopay: 1. Steel Long Panel Door with Clear Windows This steel garage door features long panels and clear glass windows that let in light and give it a modern look. It’s durable, energy-efficient, and low-maintenance for everyday use. A good choice if you want a clean style and better curb appeal for your home. 2. Insulated Long Panel Door with Frosted Windows This insulated long panel door features frosted glass that allows light to enter while maintaining privacy. It’s a wise choice for garages used as offices, gyms, or workspaces, offering warmth, quiet, and a clean look that fits your daily needs. 3. Traditional Long Panel Door with Arched Windows Classic charm meets functionality with this long panel garage door, featuring raised sections and arched windows at the top. It complements colonial or traditional-style homes, adding a warm, timeless feel to your exterior while enhancing curb appeal and property value. 4. Carriage House Long Panel Door with Crossbuck Design This carriage house garage door has cross-patterned panels and top windows, adding a rustic touch. It’s great for farmhouse-style homes, blending classic charm with daily function. A bold design that brings warmth, style, and reliable use to your garage. 5. Contemporary Flush Long Panel Door with Tinted Windows Minimalist and stylish, this door uses smooth long panels combined with dark-tinted windows for a bold, modern look. It complements sleek home designs and adds both privacy and contrast to your exterior while keeping your garage functional and secure. 6. Raised Long Panel
Durable Sectional Garage Door Panels for Every Home
Choosing a high-quality garage door enhances your home’s appearance, increases its security, and ensures smoother operation. A strong design helps protect what matters and adds value to your property with a clean, modern look. Many homeowners prefer garage doors that are easy to use, save space, and last a long time. Whether you are building a house or upgrading an older one, a better garage door can make everyday life easier. Sectional garage door panels are known for their strength, clean style, and smooth use. They work well in most homes and are made to handle daily wear while keeping the garage sealed and secure. This guide will help you understand how they work, what materials are best, and how to care for them. It also explains how to pick the right panel to match your home and budget. What Are Sectional Garage Door Panels? Sectional garage doors are made of panels connected by hinges. These panels slide up along tracks and lay flat above the garage when open. Because they move straight up, they save space and work well for homes with small driveways or limited front areas. These doors are made from strong materials like steel, wood, aluminum, or fiberglass. If one panel breaks, you can replace just that section instead of buying a whole new door. This makes repairs more affordable and helps the door last longer with lower maintenance costs. Why Overhead Sectional Doors Are a Great Choice Many homeowners prefer panel-style garage doors because they combine functionality, style, and convenience. These doors are designed to work well with different home layouts and enhance both the appearance and performance of your garage over time. Built for strength, sectional doors can handle rough weather, daily use, and minor bumps from vehicles or tools. If one part gets damaged, you only need to change that single panel, making repairs simple and less expensive. They also create a strong barrier that blocks out moisture, wind, pests, and unwanted sounds. This is especially useful if your garage is used as a workspace, storage area, or extra room for family activities. With many finishes, colors, and styles available, it’s easy to find one that complements your home’s exterior. You get a door that looks great and functions well, giving you long-term value and durability. Benefits of Sectional Garage Door Panels Segmented garage door panels offer many advantages for homeowners looking for durability, convenience, and curb appeal. Here are the top benefits explained clearly: 1. Space Saving Design Panel-style garage doors are ideal for homes with small driveways or tight spaces. These doors slide straight up along the tracks instead of swinging out. This design lets you park close to the garage without blocking it, saving space and keeping things convenient. 2. Strong and Durable Sectional garage doors are made from durable materials like steel and aluminum. They hold up well against daily use, harsh weather, and minor bumps. These panels resist rust, dents, and fading, which helps them last longer and stay looking good without a lot of upkeep. 3. Better Insulation Many sectional doors have insulated panels that help control the temperature inside the garage. This makes the space more comfortable if you use it for hobbies, storage, or even as a gym. Insulation also helps reduce heating and cooling costs throughout the year. 4. Custom Look Options You can choose from different styles, colors, and finishes to match your home. Sectional garage door panels come in both modern and traditional designs with optional features like window inserts and wood-look textures. These choices help improve the look of your home from the outside. 5. Added Home Security Sectional garage doors are built with sturdy materials and secure locking systems. Many models also work with smart home apps for remote access. This keeps your garage more secure and gives you peace of mind, whether you’re home or away. Materials Used in Sectional Garage Door Panels The durability and performance of your garage door largely depend on the material used. Here are the most common options: 1. Steel Steel is a strong and reliable material for sectional garage door panels. It resists warping, dents, and daily wear. Steel doors are affordable and easy to maintain. With protective coatings, they can handle rain, heat, and cold, making them ideal for many home styles. 2. Aluminum Aluminum garage door panels are lightweight and easy to operate. They don’t rust, which makes them perfect for homes in humid or coastal areas. Though not as tough as steel, aluminum offers a clean, modern style that fits well with contemporary or minimalist architecture. 3. Wood Wooden sectional doors bring classic beauty and charm to any home. They can be stained or painted to match your style. However, wood needs regular maintenance to avoid problems like rot, cracks, or termite damage. It’s a great option if you prefer a natural look. 4. Fiberglass Fiberglass garage door panels offer the look of real wood without the heavy maintenance. They’re durable, lightweight, and resistant to rust and salt damage. These features make fiberglass a smart choice for beach homes or areas with changing weather and high moisture levels. How to Choose the Right Segmented Garage Door Panels for Your Home Selecting the perfect garage door involves considering several factors: 1. Climate Conditions The weather in your area matters when choosing garage door panels. Insulated steel or aluminum works well in hot or cold places. For homes in humid or coastal areas, fiberglass or aluminum is better since they resist moisture and salt damage more effectively. 2. Budget Your budget will help guide your choice. Steel garage doors are affordable and low-maintenance. Wood and custom styles cost more and need regular care. When choosing a panel, think about the price and how much it will cost to maintain over time. 3. Aesthetic Preferences Garage door panels should match your home’s design. Aluminum panels have a sleek look, perfect for modern homes. Wood panels give a natural, timeless style that fits
Garage Door Panel Removal: Tools, Tips & Expert Instructions
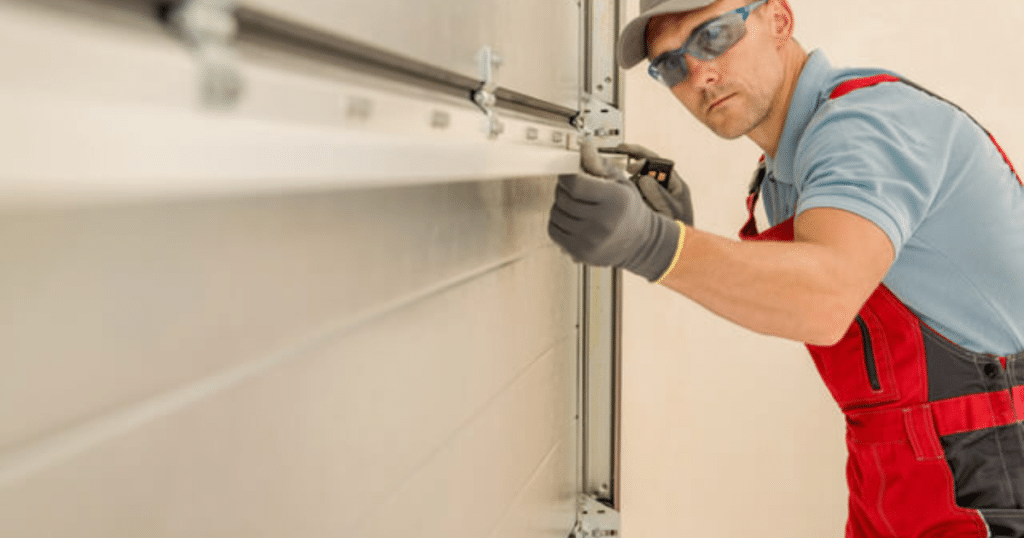
Your garage door adds safety, style, and everyday convenience to your home. However, over time, dents, rust, or other damage can affect its appearance and performance, causing it to open or close unevenly or make unusual noises. To remove a garage door panel, unplug the opener, release spring pressure, and unbolt the damaged section. Carefully lift it out while keeping nearby panels steady to avoid shifting, cracking, or affecting the overall balance of the door. Knowing how to remove garage door panels properly helps protect your door from additional damage. It also makes repairs easier and saves time by guiding you through each step with clear and simple instructions. Continue reading for tips, safety steps, and clear instructions to remove panels correctly. Fix your garage door and keep it working smoothly without replacing the entire system. When Should You Remove a Garage Door Panel? Before diving into tools and techniques, let’s first understand when it’s necessary to remove a panel. You might consider it if: The panel is bent, cracked, or dented beyond repair. Rust or rot has spread in steel or wooden doors. There’s a visible separation or warping affecting alignment. A vehicle bumped into the door, causing damage to only one or two sections of the door. You want to repaint or restore just one area of the door. Replacing one panel is often more affordable than a complete door replacement, but this depends on the extent of the damage and whether your garage door model is still available. Safety Tips Before Removing Garage Door Panels Removing a garage door panel isn’t like fixing something small. These doors are heavy and use strong springs. One mistake can be risky, so it’s essential to stay cautious, be prepared, and follow safety steps. If your garage door has a motor, unplug it first. This prevents the door from moving while you work. It’s a small step, but it helps keep you safe and makes the job easier. To remove a garage door panel, start with the one that is broken. If it’s low or in the middle, try it yourself. If it’s higher or other parts appear damaged, call a garage door repair expert. Tools You’ll Need to Remove a Garage Door Panel The process requires a few standard tools that most DIYers already have at home. These include: Adjustable wrench or socket set Cordless drill or screwdriver Locking pliers or C-clamps A ladder Work gloves and safety glasses A friend or helper (recommended) It’s always easier and safer to work on large panels with someone assisting you. Most garage door panels are bulky and can shift unexpectedly when unbolted. How to Remove Garage Door Panels Now, let’s get into the actual process. This detailed walkthrough explains how to remove garage door panels carefully and efficiently. 1. Disconnect the Garage Door Opener Pull the red release cord on your automatic garage door to stop the opener. This allows you to lift and lower the door by hand until the damaged panel is easily accessible. Unplug the opener from the wall to turn off the power. This prevents the garage door from opening accidentally and keeps you safe while working on repairs or maintenance. 2. Secure the Garage Door Clamp the garage door track below the panel using C-clamps or locking pliers. This keeps the door steady and stops it from moving while you work on replacing the damaged garage door panel. Always support the door before removing a panel, especially if it’s in the middle. A loose door can shift or fall, making garage door repair unsafe and more difficult to complete. 3. Remove the Hinge Bolts Garage door panels are connected with hinges and bolts. Use a screwdriver or socket wrench to slowly remove the bolts holding the damaged panel to the one above it. Some hinges may hold rollers, so be careful when removing them. Go slowly and keep all parts in a safe place so you can reuse them later. If the panel has support bars or struts, remove those as well. This helps loosen the panel fully, making the repair easier and safer. 4. Detach the Panel from the Track (If Necessary) If the broken panel is at the bottom, you should lift the rollers out of the side track. Open the door a little or tilt the panel gently. Be careful because the rollers sit in metal tracks under pressure. Ask your helper to hold the door steady while you carefully slide the panel out. If it feels stuck, check for any bolts or screws you missed. Don’t force it—pulling too hard can bend the track or make the door uneven. 5. Remove the Damaged Panel After removing the hinges and rollers, the panel should come loose. Lift it out slowly. If it’s large or heavy, have someone help you carry it safely. Place the panel in a safe spot. Be careful of sharp edges or splinters, especially if the door is old or made of wood. Now that the panel is out, you’re halfway done with the repair. Before installing the new panel, take a moment to review a few tips that can make the next steps easier. Expert Tips for Removing Garage Door Panels Removing garage door panels requires some care, the right tools, and a bit of skill. Follow these simple tips to do it safely and efficiently. Document Before You Dismantle Before you start removing any parts from your garage door, take clear photos of how the hinges, bolts, and brackets are set up. These pictures will help guide you when putting the new panel in place. A quick snapshot now can save a lot of trouble later. Use the Right Replacement Panel Make sure the replacement panel matches your garage door’s brand, model, and size exactly. Using the wrong panel can lead to gaps, uneven movement, or jamming. If your door is older or no longer manufactured, it might be better to replace multiple panels or even the entire
2025 Guide: Garage Door Labor Installation Costs Explained
Get a complete breakdown of garage door installation labor costs by door type, location, and more for 2025! A new garage door can boost your home’s look, add value, and make daily use easier. But before starting the project, it’s important to understand the full cost. The cost to install a garage door can vary based on the door type, size, job difficulty, and where you live, making it key to plan. Most labor costs for a basic job are between 200 and 600. This covers removing the old door, installing the new one, and ensuring it works well. This guide gives you simple prices, things that affect labor costs, and easy ways to save money. Start your project with confidence today. What Are the Cost to Install Garage Door There are two main costs associated with installing a new garage door: the price of the door and the cost of installation. Most people spend between $500 and $2,500 on the installation, and labor usually costs about $200 to $800, depending on the job. Garage door installation labor cost can change based on where you live and how hard the work is. A simple door is cheaper, but heavy or special doors cost more. It’s a good idea to ask local pros for a price before starting. Breakdown of Labor Costs Professional garage door experts to install typically charge a flat rate or an hourly fee. Here’s a general breakdown: Labor costs can significantly affect your total expenses, so it’s smart to compare quotes. Contact R&S Erection of Vallejo and book an appointment for a fast, hassle-free quote to get started immediately. What Affects Garage Door Repair Labor Costs Several variables influence the labor cost to install a garage door, including: 1. Type of Garage Door Garage doors are made of different materials, such as steel, wood, aluminum, and fiberglass. Each requires different amounts of work to install. For example, heavy wooden garage doors require more time and effort to install than lighter aluminum ones, which increases the labor cost. 2. Door Size and Weight The size and weight of the garage door affect the job’s cost. A single-car door is easier and quicker to install. Bigger or heavier doors may need extra parts like strong springs and tracks, which take longer and increase labor costs. 3. Existing Structure Condition If your garage frame is damaged or weak, it must be fixed before installing the new door. This can include replacing rotted wood, adding support, or adjusting tracks. These extra steps take more time and effort, which adds to your total labor cost. 4. Additional Components Installing extra parts like an automatic opener, insulation, or new springs takes more time. Some garage door companies include these in a package deal, while others charge for each service. These extra components can raise the final labor cost during garage door installation. 5. Geographic Location Labor costs depend on where you live. If you’re in a city with higher living expenses, expect to pay more for garage door installation. In smaller towns or rural areas, labor is usually cheaper. Always check local prices before planning your garage door project. How to Save Money on Garage Door Repair Labor While professional installation is recommended for safety and warranty purposes, there are ways to reduce the labor cost to install a garage door: 1. Compare Multiple Quotes Always ask for estimates from at least three garage door contractors. This helps you understand the average price and avoid paying too much. Comparing quotes also lets you see what’s included, like labor and materials, so you get the best deal for your money. 2. Opt for Off-Season Installation Garage door installers are often less busy during late fall and winter. Since there’s less demand, some companies may offer lower labor rates. Scheduling your garage door installation during these slower months could help you save money and still get high-quality service and results. 3. Bundle Services If you also need a new opener, springs, or weather stripping, ask about bundling services. Hiring the same company for everything can sometimes lead to a discount. It also makes the job smoother since one team handles all parts of the garage door installation. 4. DIY Partial Work You can save money by doing small tasks, like removing the old garage door or disposing of the parts. This lowers labor time and cost. Just leave the technical installation to trained professionals, like spring setup and track alignment. Is DIY Garage Door Installation a Good Idea Some homeowners consider DIY installation to save on labor costs, but this approach comes with risks: 1. Safety Hazards Garage doors are heavy and use strong springs that hold a lot of tension. Without proper training, you could get seriously hurt if you try to install or fix them. Let a trained garage door repair expert do the job to avoid injury or damage. 2. Improper Installation When a garage door isn’t installed properly, it can cause many problems. It may not open or close properly, and it could break sooner. Bad installation often leads to costly repairs. A professional ensures the door works safely and lasts longer. 3. Voided Warranties Many garage door brands won’t honor their warranty if a professional doesn’t install the door. If something breaks and you did it yourself, the warranty might not cover it. Getting expert help protects your warranty and keeps your garage door covered longer. Why Is Hiring a Professional for Garage Door Repairs Worth It While DIY garage door installation might seem like a way to save money, mistakes can lead to injuries or costly repairs. Professionals garage door company like R&S Erection of Vallejo ensure: Frequently Asked Questions Conclusion Choosing the right garage door is only part of the job. Making sure it is installed correctly is just as important. The labor cost to install a garage door can change based on the size, type, and setup. The whole process should
How to Adjust a LiftMaster Garage Door Opener for Smooth Operation
Learn how to correctly adjust a LiftMaster garage door opener with our step-by-step guide for smoother, quieter operation! To adjust a LiftMaster garage door opener, find the travel and force screws or buttons on the motor. Use the up and down controls to change how far the door moves. Turn the screw a little clockwise to go farther, or counterclockwise to go less. Test the door after each small change. Now adjust the force settings, which control how hard the opener moves the door. If it stops or reverses, turn the force screw slightly clockwise. This guide helps fine-tune your LiftMaster opener for smooth, safe, and quiet use. If issues remain, contact a garage door repair pro for help. How a LiftMaster Garage Door Opener Works Before adjusting, understand how your LiftMaster opener works. It uses a motor with a rail and trolley system. Two main settings, travel and force, control how the garage door opens and closes. 1. Adjust the Travel Limits Travel limits control how far your garage door opens and closes. If these settings are off, your door might not shut all the way or could stay slightly open. Adjusting the travel limits helps the garage door stop at the correct point for safe, smooth operation. 2. Set the Force Settings Force settings decide how much power your garage door opener uses to lift or lower the door. The door may stop halfway or reverse if the force is too low. If it’s too strong, it can be unsafe. Set it right for smooth and safe door movement. When to Adjust Your LiftMaster Garage Door Opener Not every problem with your garage door means you need a new opener. Most issues can be resolved with simple adjustments. Here are a few signs it’s time to tune things up: Safety Tips Before Adjusting Your Garage Door Before you adjust your LiftMaster garage door opener, ensure it’s safe. Unplug it or turn off the breaker. If your opener has a battery backup, turn that off too, so it doesn’t start accidentally while you’re working. Before you start, look at all the garage door parts. Check for broken rollers, loose screws, or springs that don’t look right. If something is damaged, fix it first. Adjusting a LiftMaster garage door opener won’t help if the door parts are already broken or not working well. How to Adjust Your LiftMaster Garage Door Opener at Home Fixing your garage door opener may seem complicated, but following this guide is simple. 1. Find the Adjustment Screws or Buttons Look on the opener for small screws or buttons. You’ll see ones marked “up,” “down,” or “force.” Older openers use screws. Newer ones use arrow buttons or +/– signs. These control how far and how hard the door moves. 2. Adjust How Far the Door Opens and Closes If your door doesn’t open high enough or won’t close all the way, change the travel settings. Turn the “down” screw to make the door close more. Turn the “up” screw to help it open fully. For digital models, press the arrows and hit “Set.” 3. Adjust the Force Settings The force setting controls how strong the motor is. The force may be too low if the door stops too early or won’t move. Turn the screw a little clockwise to increase it. On new models, use the arrows and press “Set” when done. 4. Test the Safety Reverse Open the door. Place something like a roll of paper towels under it. Close the door. It should touch the object and go back up. If not, lower the force setting. Always make sure this safety feature works to keep people and pets safe. 5. Check the Safety Sensors Look near the bottom of the door for small sensors. They must point at each other. If one light blinks, move it until both lights are solid. Wipe off any dirt so they can work properly. This keeps the door from closing on things. How to Maintain Smooth Garage Door Operation Once your LiftMaster opener is adjusted, a little regular maintenance goes a long way in keeping it working flawlessly. Here are a few simple tips: 1. Lubricate the Moving Parts Apply garage door lubricant to the rollers, hinges, springs, and tracks every three to six months. This reduces noise and wear. Keeping parts smooth helps your garage door run better and last longer by preventing rust and friction buildup. 2. Tighten Loose Hardware Garage doors move frequently, which can loosen screws and bolts. Use a screwdriver or wrench to check and tighten them often. Tight hardware keeps everything secure, helping your garage door stay safe and work quietly without extra shaking. 3. Inspect the Tracks Look at both vertical tracks along the garage door’s sides. Make sure they’re straight, clean, and tightly fastened. Wipe away dust, dirt, or grease. If the tracks are bent or misaligned, your garage door may shake, get stuck, or move unevenly. 4. Check the Balance Disconnect the garage door opener and lift the door by hand to the halfway point. The springs could be worn or out of balance if they move independently. An unbalanced garage door can strain the opener and lead to damage. Troubleshooting Tips for Garage Door Alignment and Settings If the door still acts up after adjusting the LiftMaster garage door opener, don’t panic. Here are a few common issues and what they usually mean: When to Call a Pro for Garage Door Help Some garage door opener problems can be fixed with minor changes, but not all. If your door looks uneven, the springs are broken, or the opener still doesn’t work after adjusting, it’s best to call a garage door repair expert for help. Garage doors have strong parts like springs and cables that can be dangerous. You could get hurt if you don’t know how to fix them the right way. Even when adjusting a LiftMaster garage door opener, it’s
Garage Door System Parts: A Homeowner’s Guide

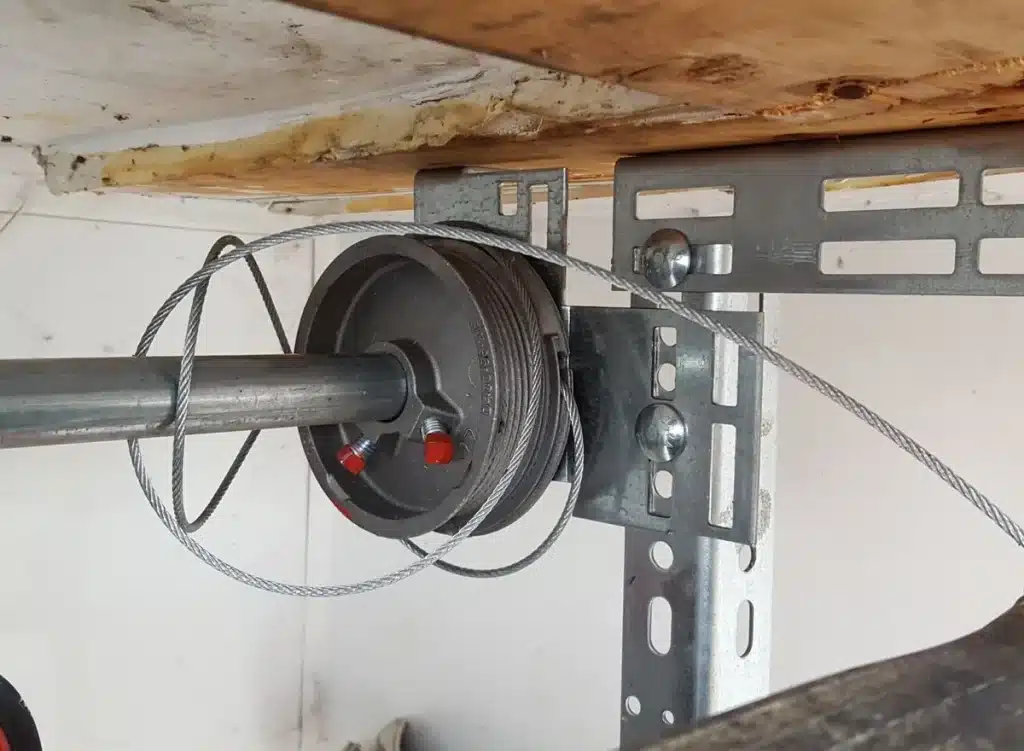
Discover how each part of a garage door system contributes to functionality. Get detailed descriptions and maintenance tips! A garage door system has many important parts that work together to open and close the door safely and smoothly. These include the door panels, torsion or extension springs, cables, rollers, tracks, and the opener. Each part plays a key role in lifting the door, guiding its motion, and keeping the system running well. Other key parts of a garage door system are the hinges, brackets, weather seals, safety sensors, and remote or wall controls. Knowing how these parts work helps you care for your door, fix minor problems, and know when to call a garage door repair service. This keeps your garage door working properly every day. Garage Door System Parts Explained Simply A garage door system consists of mechanical, electrical, and structural elements. Below, we’ll explore the key parts of a garage door system in detail. 1. Garage Door Panels Garage door panels are the big, flat parts that form the door. They’re usually made from steel, wood, aluminum, or fiberglass. Hinges connect the panels so the door can bend and roll smoothly on the tracks when opening or closing. 2. Garage Door Springs Springs counterbalance the door’s weight, making it easy to lift manually or with an opener. There are two main types: 3. Garage Door Tracks and Rollers Garage door tracks help the door move up and down in a straight path. The rollers, usually made of nylon or steel, let the door slide smoothly. If the tracks are bent or the rollers wear out, the door may get stuck or make noise. 4. Garage Door Opener The garage door opener is the motor that opens and closes your door. It works with a chain, belt, or screw drive. Many openers now come with Wi-Fi, so you can use your smartphone to control your garage door from anywhere. 5. Garage Door Cables and Drums Garage door cables are strong wires that work with springs to lift the door. These cables wrap around round metal parts called drums. If a cable breaks, the door can become uneven or fall, which is dangerous. It’s best to call a garage door repair pro. 6. Garage Door Hinges and Brackets Hinges let the panels on the garage door bend as it moves. Strong hinges are used in the spots that get the most pressure. Brackets hold the door’s parts in place, like the springs and tracks, and keep everything safe and steady. 7. Garage Door Weather Stripping and Seals Garage door weather stripping is the rubber seal along the bottom and sides of the door. It blocks wind, rain, bugs, and dust from getting inside. If the rubber looks cracked or worn, replace it to protect your garage year-round. 8. Garage Door Safety Sensors Safety sensors are small devices near the floor on both sides of your garage door. They send a beam to each other. If something breaks the beam while the door is closing, the door will stop and go back up to prevent accidents. 9. Garage Door Locks and Handles Garage door locks add extra safety if you want to keep it closed without using the opener. Handles help you open the door by hand during a power outage. Both give you control and make your garage more secure. How Garage Door Parts Work Together The parts of a garage door system work together to open and close the door smoothly. Each part plays an important role in keeping the door safe, balanced, and working correctly. Garage Door Problems and Solutions Many homeowners experience garage door issues. Here are simple reasons why your door won’t open or close and how to fix them. 1. Door Won’t Open or Close 2. Loud Noises During Operation 3. Door Closes but Reopens Immediately 4. Gaps or Drafts How to Keep Your Garage Door Working Longer Garage doors last longer when you take care of them. Here are simple maintenance tips to help keep your garage door working well: 1. Lubricate Moving Parts To keep your garage door working smoothly, apply lubricant to the springs, rollers, and hinges every six months. This reduces noise, prevents wear, and helps all moving parts last longer. Never use grease, as it attracts dust and dirt. 2. Inspect Cables and Springs Take time to look closely at your garage door cables and springs. Check for rust, fraying, or loose tension. These parts hold a lot of force, so never try to repair them yourself. Call a trained garage door technician for help. 3. Test Safety Features Make sure your garage door’s safety system works right. Place a small solid object under the door and try closing it. The door should stop and reverse when it touches the object. If not, check the sensors or call for service. 4. Check Balance Pull the release handle to disconnect your garage door opener. Lift the door halfway and let go. If it stays in place, the balance is good. If it falls or rises, the springs may need adjustment from a garage door professional. When Should You Call a Professional for Garage Door Help While some maintenance tasks are DIY-friendly, certain repairs require expert handling: 1. Spring Replacement Replacing garage door springs is risky. These parts are under strong tension and can snap suddenly. One wrong move can cause serious injuries. It is safer and smarter to let a trained garage door repair expert handle any spring repair or replacement job. 2. Track Fix Bent or misaligned garage door tracks can stop your door from moving smoothly. Fixing them on your own might cause more problems. A pro knows how to realign tracks safely, keeping your garage door working properly and avoiding further damage. 3. Motor Trouble Garage door opener motors have electrical parts that are hard to fix without experience. Messing with the wiring or gears can cause bigger issues. If your
Easy Steps on How to Change Your Garage Door Cable
Is your garage door not opening? Your cable may need replacing. Follow this complete DIY tutorial to fix it right the first time! If your garage door is stuck, uneven, or not opening correctly, a worn or broken cable might be the cause. Learning how to change a garage door cable at home can help you avoid expensive repair costs. Following simple safety steps and using basic tools can restore your garage door’s smooth, safe operation without stress. Unplug the opener and open the garage door manually, using clamps to hold it in place. Remove the damaged cable from the bottom bracket and drum. Install the new cable, keeping it tight and even. Test the door after replacement. Contact a garage door repair professional for safe and proper help if you’re unsure. How Garage Door Cables Work and Why They Matter Before diving into the replacement process, it’s important to understand the role of garage door cables. These cables work with the springs to lift and lower the door smoothly. There are two main types: 1. Lift Cables Lift cables are strong metal wires connected to the bottom brackets of your garage door. They work with the springs to lift and lower the door smoothly. If a lift cable breaks, the door can tilt, jam, or stop moving properly. Check them often. 2. Safety Cables Safety cables run through the middle of extension or torsion springs. If a spring snaps, these cables keep it from flying off and causing harm. They help prevent accidents and damage. Always ensure your garage door has safety cables and check them for wear regularly. Tools and Materials Needed for Garage Door Fixes You need the right tools and materials to replace your garage door cable safely and correctly. Here’s a simple checklist: Steps on How to Change Garage Door Cable With the right steps and tools, you can learn how to change a garage door cable by disconnecting the opener, securing the door, releasing the tension, and replacing the cable safely. Step 1: Disconnect the Garage Door Opener Safety comes first. Unplug the garage door opener so it doesn’t start while you’re working. Pull the red emergency release cord to disconnect the door from the opener. This lets you move the door by hand without any risk. Step 2: Secure the Door in the Open Position Lift the door. Use locking pliers to clamp the track just below the bottom rollers. This holds the door in place and keeps it from falling while you work. It’s a simple but very important step. Step 3: Release Tension from the Springs Garage door springs are very strong. If your door uses extension springs, gently remove them from the pulleys. If it has torsion springs, use winding bars to unwind them slowly. Take your time and stay careful to avoid injury. Step 4: Remove the Old Cable Find where the cable connects to the bottom bracket and the drum. Loosen the bolts or screws holding it. Gently unwind the cable from the drum. Pay attention to how the cable is routed so you can follow the same path later. Step 5: Install the New Cable Start by attaching the new cable to the bottom bracket. Then thread it through the same path as the old cable. Wrap it around the drum and make sure it fits in the grooves. Tighten the bolts to hold it in place. Step 6: Re-tension the Springs After installing the new cable, carefully add tension to the springs again. For torsion springs, twist them with winding bars. For extension springs, hook them back to the pulleys. Be slow and steady to stay safe during this part. Step 7: Test the Door Take off the locking pliers and gently lower the door. Watch how it moves. If it’s jerky or noisy, recheck the cable and springs. The door should open and close smoothly without strange sounds or uneven movement. Step 8: Reconnect the Garage Door Opener Plug the opener back in. Pull the emergency release cord upward to reconnect the opener to the door. Use the wall button or remote to test the door. Make sure it opens and closes properly with no issues. Safety Tips When Changing Garage Door Cables Changing garage door cables can be risky if you’re not careful. Here are safety tips to help you do it safely and correctly. 1. Wear Protective Gear Always wear gloves and safety goggles when working on garage door cables. Gloves protect your hands from sharp wires, and goggles protect your eyes from flying debris. A little protection goes a long way to help you avoid serious injuries. 2. Work with a Partner Garage doors are heavy and have parts under strong tension. Having someone with you makes the job safer. A partner can hold tools, help lift parts, or call for help if needed. It’s always safer to fix garage door parts together. 3. Avoid Over-Tightening Springs If you tighten the springs too much, they can snap and hurt someone or damage the door. Use the right amount of tension and follow the maker’s instructions. This helps your garage door work right and keeps everyone around safe. 4. Inspect Other Components When you change the cable, take time to check other parts too. Look at the rollers, hinges, and springs. If they look worn, rusty, or broken, replace them. Fixing minor problems early helps your garage door last longer and work better. When to Call a Pro for Garage Door Repairs Knowing how to change a garage door cable is helpful, but knowing when to call a garage door expert can save you from injury and prevent bigger problems. Here’s when. 1. Broken Springs Garage door springs help lift and lower the door. When they break, the door can become heavy or stop working. Because these springs are under strong tension, fixing them yourself is risky. Always call a garage door repair expert for safe repair. 2.
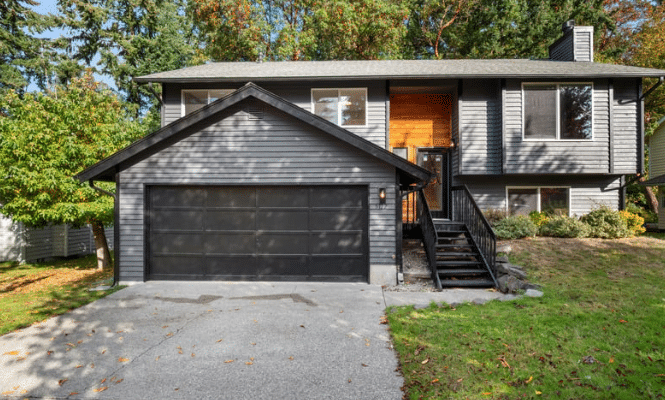
2025 Trends: Black Garage Doors for Red Brick Houses
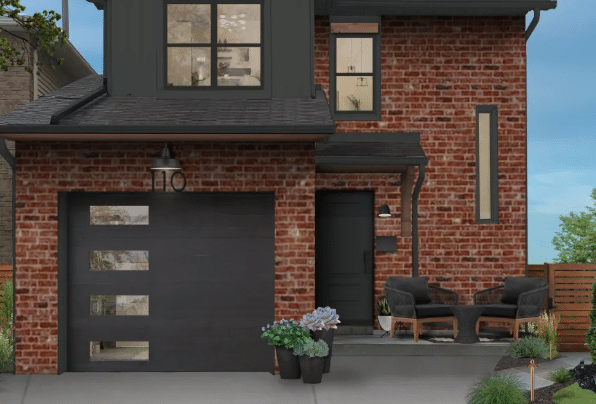
Stay ahead with the latest exterior design trends. Discover why black garage doors are the 2025 favorite for red brick homes, and how to style yours! If you’re considering upgrading your home’s curb appeal in 2025, black garage doors on red brick houses are a smart and stylish choice. The dark color stands out against the warm red brick, making your home look clean and modern. It adds charm and gives your house a bold new look. This trend works well with many home styles. Flat panels, matte finishes, and small windows are popular options. You can also add black trim or outdoor lights to match. It’s a simple way to give your home a fresh look while adding value and charm to your property. Why Black Garage Doors Are Trending in 2025 Black garage doors are a top trend for 2025, fitting modern and classic homes. Homeowners love the bold contrast and clean look, making black a stylish and lasting choice for today’s simple, dramatic home designs. Here’s why black garage doors are trending more than ever: 1. Visual Impact A black garage door stands out and catches the eye right away. It turns your garage door into a key feature instead of something easily ignored. This bold look adds personality and boosts curb appeal, making your home look more stylish and welcoming. 2. Versatility Black garage doors complement many home materials, such as brick, stone, wood, or siding. They also blend easily with classic and modern styles. Whether your house is red brick or neutral-colored, a black door adds contrast and smoothly pulls the whole look together. 3. Modern Elegance Choosing a black garage door gives your home a clean, modern appearance. It adds a sleek and elegant touch to the outside, helping your house look updated without major changes. Black works well for homes with minimalist, high-end, or contemporary designs. 4. Increased Resale Value Homes with trendy exterior features like black garage doors often get more attention from buyers. These minor upgrades make your home feel more current. If you plan to sell, this modern touch could help raise your home’s value and attract better offers. Why Red Brick and Black Are a Perfect Match Red brick and black are a perfect match because they create a strong and balanced contrast. The rich, earthy tones of red brick bring warmth, while black adds depth and boldness. Together, they highlight each other’s best features without overpowering the overall look. Black garage doors on a red brick house make the brick appear more vibrant and defined. The sleek black finish gives a touch of modern style that pairs beautifully with the brick’s traditional charm. It’s a mix that feels timeless yet fresh. This color combo works well with accents like white trim, black window frames, or iron fixtures. It ties the whole exterior together, making your home look clean, elegant, and visually striking from the street. Design Styles That Work with Black Garage Doors on Red Brick Houses One of the best things about this trend is its versatility. No matter your home’s architectural style, there’s likely a black garage door design that will fit right in. 1. Traditional Colonial or Georgian Homes For red brick homes with a classic style, black garage doors bring a rich, timeless look. Pick simple panel designs or carriage-style doors with black metal handles. These small details add old-style charm and make your garage match the home’s historic feel. 2. Modern and Contemporary Homes Black garage doors with smooth surfaces and clean lines work well with modern homes. Adding glass panels or thin horizontal lines keeps the look simple but stylish. This door type makes your home look updated and neat without being too flashy. 3. Industrial or Urban Style Red brick homes with an industrial or city look go great with black steel garage doors. Look for ones with metal parts that show or a flat, no-shine finish. This adds a cool, strong style that fits your home’s bold, urban design. 4. Farmhouse and Craftsman Style Farmhouse and Craftsman homes feel warm and inviting, and a black garage door adds a nice bold touch. Mix it with wood beams or simple wood siding to keep the cozy feel. The black color gives contrast while still fitting the home’s rustic charm. How to Pick the Right Garage Door Material for Red Brick Homes Not all black garage doors are created equal. When selecting one for your red brick house, the finish and material matter as much as the color itself. 1. Finish Options 2. Material Choices Best Lights and Handles for Your Garage Door When installing black garage doors on a red brick house, don’t overlook the supporting features. Lighting and hardware can either elevate or dull the entire exterior design. Lighting Good lighting helps your black garage door stand out, especially at night. Use black or bronze wall lights with warm-colored bulbs to brighten the space. You can also add side LED lights to create soft shadows that show off the brick and door style. Hardware Adding black or old-style metal handles and hinges can give your garage door a classic feel. If you like a more modern look, skip the handles and choose a door with flat, smooth panels. This keeps the design simple and makes the door look clean and fresh. Maintenance Tips for Black Garage Doors To keep your black garage doors looking fresh and stylish, follow these care tips: 1. Clean Regularly Wash your black garage door with mild soap and water every few weeks. This helps remove dust, dirt, and spots. Regular cleaning keeps the door looking fresh and shiny, while also protecting the finish from damage caused by buildup. 2. Avoid Harsh Chemicals Stay away from strong cleaners or bleach when washing your garage door. These can fade the color, leave streaks, or damage the surface. Use gentle products to keep the black finish smooth, bright, and looking great
How to Coat Garage Floor with Epoxy in Vallejo, CA – Expert Step-by-Step Guide for a Perfect Finish!

If you want a garage floor that is tough, long-lasting and looks great, epoxy coating is the perfect solution. It not only enhances the appearance of your space but also protects the concrete from stains, cracks, and wear. Whether upgrading your home or improving your workspace, understanding how to coat your garage floor with epoxy can help you achieve a smooth, professional finish that lasts for years. This expert guide will walk you through how to coat your garage floor with epoxy in Vallejo, CA, covering every step from preparation to application. You will also get essential tips to avoid common mistakes and ensure the best results. A properly coated floor can make a big difference in function and style. If you’re planning other upgrades, check out garage doors and gates in Vallejo, CA, to complete your garage transformation! Why Should You Epoxy Your Garage Floor in Vallejo, CA? Applying an epoxy coating to your garage floor comes with multiple benefits. First, it provides a sleek and professional look, making your garage appear cleaner and more organized. Epoxy coatings are also incredibly durable and resistant to chemicals, oils, and moisture, making them ideal for garage floors that experience heavy foot traffic and vehicle use. Another advantage is that an epoxy-coated garage floor is easier to clean than bare concrete. Dust, dirt, and spills can be wiped away quickly without seeping into the surface. Vallejo’s climate, with its moderate temperatures and occasional moisture, can also lead to concrete damage over time. Epoxy helps seal the floor and protects it from cracks and weather-related wear. An epoxy garage floor can be a selling point for those looking to improve their home’s resale value. Homes with well-maintained garage floors stand out, making them more attractive to potential buyers. What are the Steps to Properly Coat a Garage Floor with Epoxy? Successfully applying an epoxy coating requires a systematic approach. Skipping steps or rushing the process can lead to poor adhesion, bubbles, and peeling. Here’s a step-by-step breakdown of how to coat the garage floor with epoxy properly. Step 1: Clean and Prepare the Garage Floor Before applying epoxy, the garage floor must be completely clean. Clear out all furniture, tools, and any clutter from the garage. Sweep and vacuum the floor to eliminate dust and loose particles. Use a degreaser or a specialized concrete cleaner to remove oil stains and other contaminants for thorough cleaning. Any dirt left on the surface can prevent the epoxy from adhering correctly. Step 2: Repair Any Cracks or Imperfections Inspect your garage floor for any cracks, pits, or uneven areas. Epoxy will not hide these flaws, instead, it can accentuate them. Fill any cracks and holes with a concrete patching compound. Allow the patched areas to dry and sand them down for a smooth finish. Step 3: Etch the Concrete Surface Concrete must have a rough texture for the epoxy to bond properly. You can achieve this by grinding the surface with a floor grinder or using an acid etching solution. Grinding is the more effective method, but acid etching is an alternative if you don’t have access to a grinder. Step 4: Allow the Floor to Dry Completely Moisture is the enemy of epoxy. After etching or grinding, ensure the floor is completely dry before proceeding. A moisture test can help determine if the floor is ready for epoxy application. Step 5: Mix the Epoxy Components Epoxy coatings usually come in two parts: a resin and a hardener. Make sure to follow the manufacturer’s directions closely when mixing the two parts. Improper mixing can lead to an uneven or sticky finish. Step 6: Apply the Epoxy Coating Start by applying an epoxy primer if your chosen product requires one. This helps improve adhesion and durability. Once the primer is dry, begin applying the epoxy coating. Use a roller to spread the epoxy evenly across the floor in thin coats. Work in small sections to prevent the epoxy from drying too quickly before spreading it properly. Step 7: Add Decorative Flakes (Optional) You can sprinkle epoxy flakes onto the wet surface for added texture and a decorative finish. These flakes also help improve slip resistance. Step 8: Apply a Second Coat (If Needed) After the first coat dries, inspect the floor. If necessary, apply a second coat of epoxy for enhanced durability and an even finish. Step 9: Allow Proper Curing Time Epoxy needs time to cure fully. Avoid walking on the floor for at least 24 hours, and wait at least 72 hours before driving on it. Coating your garage floor with epoxy is a great way to improve durability and appearance. Following the right steps, you can achieve a smooth, long-lasting finish that enhances your space. Do You Need to Prepare Your Garage Floor Before Applying Epoxy? Yes, proper preparation is key to a successful epoxy application. Skipping steps can lead to peeling, bubbles, or weak adhesion. Cleaning, repairing cracks, and etching the surface help the epoxy bond properly for a smooth, durable finish. If you’re wondering how to coat the garage floor with epoxy in Vallejo, CA, starting with the right preparation work is the first step to long-lasting results. What are the Common Mistakes to Avoid When Epoxying a Garage Floor? Applying epoxy to your garage floor can give it a strong, polished look, but simple mistakes can ruin the finish. Understanding how to coat the garage floor with epoxy helps avoid issues like peeling, bubbling, or poor adhesion. Avoiding these mistakes ensures a smooth, long-lasting epoxy floor that enhances your garage. Take your time and follow the right steps for the best results! How Long Does Epoxy Garage Flooring Last in Vallejo’s Climate? A properly applied epoxy garage floor can last 10-20 years with the right care. In Vallejo’s climate, which has mild temperatures and occasional moisture, epoxy provides excellent durability. Regular cleaning and avoiding heavy impacts can help extend its lifespan. If you’re wondering how to coat the garage floor
